Create a Plan
A plan is a sequence of tasks that are executed manually or based on a schedule. Plans can be used to automate the execution of multiple related tasks, such as all of the outputs generated from a set of multiple related flows.
When a plan is triggered:
A snapshot of the objects in the plan is capture. This snapshot defines the set of tasks that are executed as part of a plan run.
Note
A snapshot does not capture the objects underlying the tasks. After a snapshot is taken, subsequent changes to the underlying flows could impact the outcome of the flow tasks when they are later executed during the plan run.
The set of tasks in the plan are triggered in the order listed in the plan.
All of the dependencies for any task are also executed. For example, if a flow output requires the outputs from another upstream flow, then that flow's output is also generated.
If one task fails to execute, the other tasks are not executed.
For more information on plans, see Overview of Operationalization.
Before You Begin
Before you begin, please verify the following:
You have access to all of the flows that you wish to use in your plan.
For each flow in your plan:
All of the recipes whose results you wish to generate have output objects associated with them.
Each output object has at least one of the following that has been created for it:
file-based output
table-based output
Note
In a flow, all recipes that you wish to have executed by the corresponding task must have a defined output object. For each output object, you must create at least one write file or table settings definition. During plan runs, these objects are not validated, and missing outputs are ignored.
Workflow
Note
Parameter values are applied to a plan, but you cannot apply parameter overrides to the plan. You can apply flow parameter overrides on individual flows, which are applied at the time of plan execution. For more information, see Manage Parameters Dialog.
Workflow steps:
Identify the tasks that you wish to execute.
Note
You must have access to any flows that you wish to execute. See Flows Page.
Add a task.
In Plan View, click the Plus icon at the bottom of your plan.
Specify the task to execute.
Repeat the previous step to add additional tasks as needed.
Tip
You can insert tasks between other tasks. Use the Plus icon between two plan objects.
To test your plan, click Run now. The plan is immediately executed.
Edit the plan and repeat the above steps until the plan is ready for production runs.
Tip
While a plan is in development, you may wish to disable its schedule, which prevents execution according to the schedule. You can still run test executions using the Run Now button.
Create the schedule for the plan.
In the context menu for the plan, select Schedule.
Specify one or more triggers for the schedule. When a trigger occurs, the plan is queued for execution.
When ready, the plan runs at the time scheduled in the trigger.
Create Plan
To begin, you must create a plan object.
Steps:
From the left nav bar, click the Plans icon.
The Plans page is displayed. See Plans Page.
In the Plans page, click Create. A new plan with the name
Untitled - Xis created, whereXis a number.Click the
Untitled - Xto enter a plan name and description.Your plan is saved and displayed in Plan View. See Plan View Page.
In Plan View, you create the objects that are part of your plan. These include:
Plan Schedule: A schedule is composed of one or more triggers that determine when the plan is executed.
Trigger: Scheduling object that determines the conditions under which the plan is executed.
A schedule can contain one or more triggers.
Task: An action that is executed when triggered.
You can build a sequence of one or more tasks in your plan.
Add Plan Schedule
You can add a schedule object to specify the triggers when the plan is to be executed.
Note
A plan's schedule cannot be executed until its schedule has been enabled. If a plan has a disabled schedule, you can still execute it via the Run Now button.
Steps:
When you first open Plan View, you should see an empty plan:
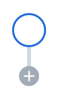
Figure: Plan View - empty plan
To begin, do one of the following:
From the Plan View context menu, click Schedule.
Click the big circle.
In the right context panel, click Create schedule.
In the Add Trigger panel, you can specify the triggers when the plan is executed. You can specify one or more triggers:
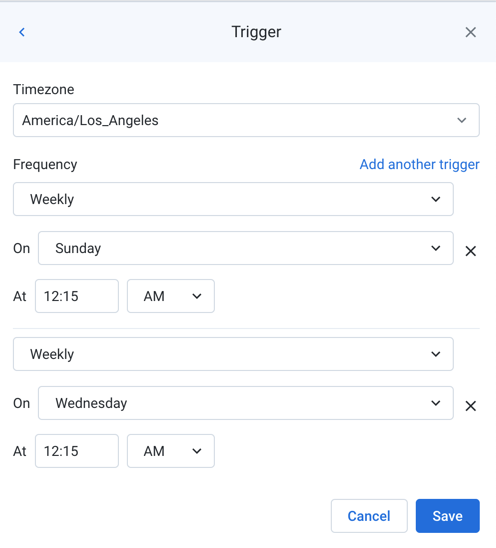
Figure: Add trigger(s)
For each trigger:
Timezone: Specify the timezone that applies to the scheduled time. For more information on timezones, see Supported Time Zone Values.
Frequency: You can specify the frequency of when the schedule is triggered.
In each trigger, you can specify multiple On values (e.g. Same time on Sunday and Monday).
As needed, you can specify the On value using a modified form of cron job syntax. For more information, see cron Schedule Syntax Reference.
To add more triggers, click Add another trigger and specify it.
To delete a trigger, click the X next to it.
Parameter overrides:
If the flows in your plan contain parameters, you can apply overrides to the parameter values.
Overrides provided in this panel are applied only when the trigger is executed.
Note
Multiple values are ok for plan parameters, as long as the parameter values do not conflict. If you see a warning icon next to a set of multiple parameter values, then you must fix this conflict, or the plan fails to execution. For more information, see Manage Parameters Dialog.
You can apply overrides through Plan View, too.
For more information, see Manage Parameters Dialog.
To save your schedule, click Save.
In the context panel, you can make changes to your schedule:
After saving, the schedule is automatically enabled. To disable the schedule, use the slider bar.
Note
A plan cannot be executed if the schedule for it has been disabled.
To make changes to the schedule and its triggers, click Edit.
Add Task
Based on the schedule's triggers, you can define a sequence of one or more tasks that are executed.
To add a new task, click the + icon below the trigger. Select the type of task in the right panel.
To insert a task between two other objects, click the + icon between them.
Add run flow task
A flow task executes the recipes that produce the output objects of the flow.
Steps:
After you select the flow task type, use the Search bar or browse to select the flow that you wish to add as the task.
Select the output or outputs that you wish to generate from the selected flow.
Click Create task.
The task is created and added to the plan.
For more information, see Plan View for Flow Tasks.
Add HTTP task
An HTTP task is a request sent using HTTP protocol to a target URL, which could be a REST API endpoint.
Note
Specifying an HTTP request requires knowledge of the target endpoint and the parameters required for the request. HTTP tasks are considered developer-level objects.
Steps:
After you select the HTTP task type, you can specify the task in the context panel.
Specify the fields of the request.
Tip
If possible, you should test the HTTP task before you create it. To test for basic connection, you should use the GET method, which just returns relevant information. Some other methods are potentially destructive.
Click Save.
The task is created and added to the plan.
For more information, see Create HTTP Task.
Add Slack task
A Slack task is a message submitted from the Trifacta Application to a specified Slack channel.
Steps:
After you select the Slack task type, you can specify the task in the context panel.
Specify the fields of the request.
Click Save.
The task is created and added to the plan.
For more information, see Create Slack Task.
Apply Parameter Overrides
If your plan tasks include flows in which parameters have been defined, you can review and override these parameter values. Overrides are applied when the task is triggered as part of a plan run.
Steps:
From the Plan View context menu, select Parameters.
Review the names, sources, and current values for all of the parameters in your plan.
To apply an override, click the Pencil icon and enter a new value. Click Save.
Subsequent runs of the plan use this new value as the override for the parameter.
For more information, see Plan View for Flow Tasks.
For more information on flow parameters, see Manage Parameters Dialog.
Create Branching Plan
In some scenarios, you may need to branch plan execution steps based on the results of a task in the plan. For example, you may need to send separate messages using an HTTP task depending on whether a flow task succeeds or fails in execution. You can create branches in the plan graph by adding task execution rules and parallel nodes, which run based on the success and failure states of your plan runs.
To begin this simple example:
Create your first task, which is a flow task in the above example. For more information, see Add Tasks above.
Complete the following sections.
Add Task Execution Rule
Next, you create the first HTTP task that results from the above task and the execution rule that determines when it runs.
This task should run based on the successful execution of the flow task.
A task execution rule is a condition that is tested after a flow task has run to determine if the task that is downstream of it is executed as a result. In this case, you create an
On successrule.
Steps:
Click the plus icon below the existing flow task node.
Select the HTTP task type and enter information in the required fields. See Add HTTP Tasks above.
Click the link connecting the created HTTP task node and its previous task node and select
On success.
The HTTP task is executed only when the flow task has run successfully.
Add Parallel Task
Next, you can create the HTTP task that runs when the flow task fails.
Steps:
Click the plus icon below the existing flow task node and select Add a parallel node. A parallel node is added to the plan graph. See Example below.
Select the HTTP task type and enter information in the required fields. See Add HTTP Tasks.
Click the link connecting the new HTTP task and its previous task node and select
On failure.
The second HTTP task is executed only when the flow task has failed to execute.
Tip
You can use parallel tasks to create separate paths through a plan when there are no dependencies between the paths.
Example - Success or Failure Tasks in a Plan
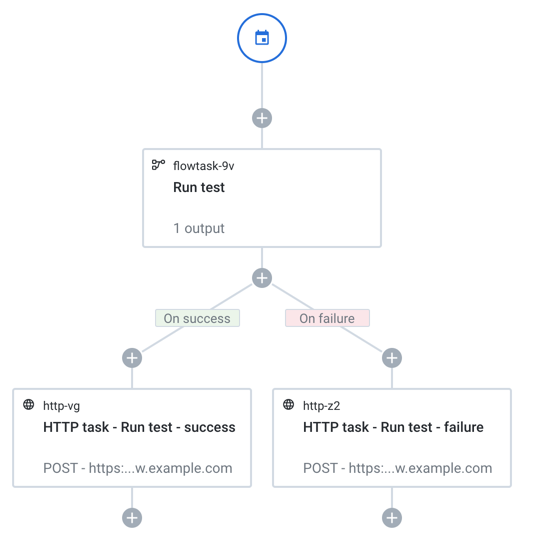 |
Figure: Success and Failure tasks
When the flow tasks complete successfully, the On success HTTP task sends a message.
When the task fails, the On failure HTTP task delivers a different message.
Test Plan
After you have created the triggers and tasks of your plan, you can perform a test run of the plan.
Steps:
To test, click Run now.
The plan run is queued for execution.
Monitor Plan Runs
in the upper-right corner of Plan View, click the Runs link.
In the Plan Runs page, you can track the progress of your plan run.
The most recently triggered plan run is displayed.
If you have executed multiple runs, you can use the angle brackets next to the timestamp for the run.
For tasks in progress, you can click the task to display information in the context panel.
To see the details for the plan run, click the Outputs tab. Then, click Job details. See Job Details Page.
You can monitor the progress of your plan runs and review all previous plan runs. See Plan Runs Page.