Plan View Page
In Plan View, you design your plan, which includes the building and sequencing of tasks and the triggers that execute your sequence of tasks.
Note
Access to this page in the application and privileges on its related objects is governed by roles in your workspace. For more information, please contact your workspace administrator.
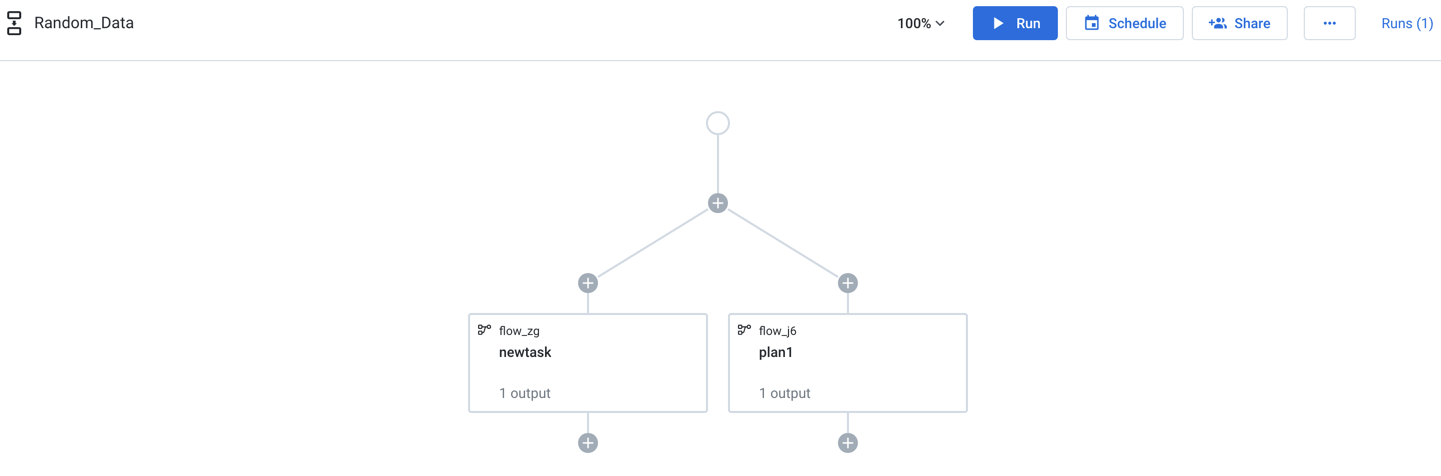
Figure: Plan View Page
The main panel is the plan canvas, where you build your plans.
On the right side is the context panel. Depending on what you select in the plan canvas, a different set of context options is displayed.
Top Bar
Tip
To rename the plan, click the plan name in the top bar.
Zoom Options:
You can zoom the plan canvas to display areas of interest in the plan graph.
The zoom control options are available at the right side of the canvas. The following are the available zoom options:
Tip
You can use the keyboard shortcuts listed in the zoom options menu to make quick adjustments to the zoom level.
Zoom in: Zoom in 10% on the canvas to focus on greater detail.
Zoom out: Zoom out 10% from the canvas to see more of it.
Zoom to fit: Change the zoom level to fit all of the objects of your plan onto the screen.
25%, 50%, or 100%: Change the zoom level to one of the preset levels.
Note
By default, the plan view page always opens in Zoom to fit option and it does not remember the previous zoom and position.
Other options:
Run: Run the plan. You can track progress of your plan run. See Plan Run Details Page.
Tip
You can apply overrides to flow parameters through the Parameters tab. See Plan View for Flow Tasks.
See Plan Runs Page.
Schedule: Create or edit the plan schedule with one or more triggers through the right context panel. See "View for Tasks."
Share: Share the plan with other users. See Share a Plan.
Runs: The Runs link tracks the current total number of runs that have been queued or executed for this plan. Click this link to track progress on your plan run.
Workflow
For more information, see Create a Plan.
Task Execution Rule
You can gate the execution of a task based on the completion status of its previous task. Click the line connecting the two tasks and select one of the following options:
On success: Runs if the previous task in the node is successful.
On failure: Runs if the previous task in the node failed.
On execution (any status): Runs the task in the node irrespective of the previous task's status (success or failure).
Parallel Tasks
You can can execute one or more tasks in parallel by clicking the plus node icon and selecting one of the following options:
Add a parallel node: Adds a parallel node to the existing node.
Add a node: Adds a node at the bottom of the existing node.
Note
Nodes added in a sequence are separated by a plus node. A node added in parallel has two plus nodes separating it from the parent node; one for adding nodes in parallel and other for adding a node in sequence.
View for Triggers
To create a trigger, you specify the time and frequency that the plan is to be executed.
Note
Plan owners can create triggers for their plans. Other users must have the appropriate privileges to create triggers for the plan.
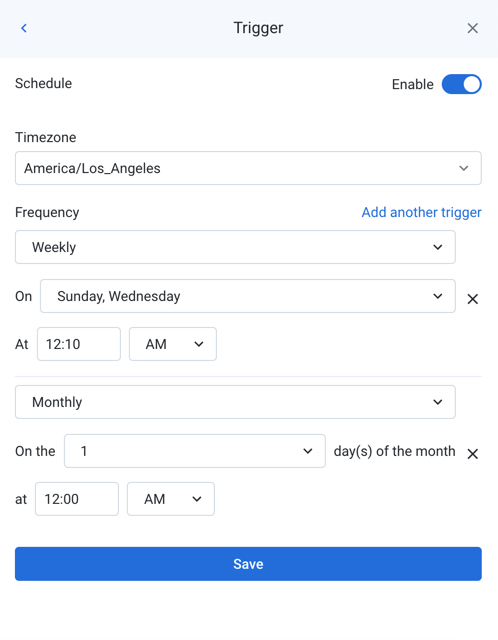
Figure: Create plan trigger
Timezone: Select the timezone for the time that you are specifying in the trigger's schedule.
To use UTC time zone, select
UTCin the drop-down.For a list of supported timezones, see Supported Time Zone Values.
Frequency: Specify how frequently the plan is triggered:
On: You can specify multiple entries to trigger the plan more frequently.
cron: Set the schedule according to cron syntax.
Time zone settings set in the drop-down are used with the cron schedule.
For more information, see cron Schedule Syntax Reference.
To add another trigger, click Add another trigger.
To save your changes, click Save.
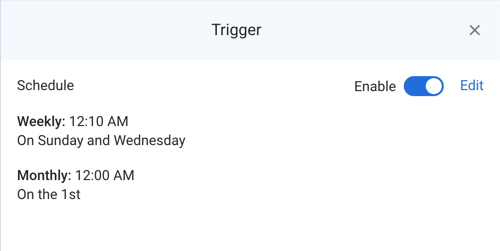 |
Figure: Saved trigger
To disable the trigger, click the slider.
Note
If you disable a trigger, no new scheduled executions of the tasks in the plan occur. You can still manually trigger plan runs.
To make changes to the trigger, click Edit.
View for Tasks
When you create or select a task, you can modify its settings through the context panel on the right.
Tip
To rename the task, click the task name in the context panel.
Task context menu options:
View Flow: Open the flow. See Flow View Page.
Edit name: Modify the name of the task.
Delete: Delete the task from your plan.
Task types
Flow task: Generate all of the defined output objects for a flow. See Plan View for Flow Tasks.
HTTP task: Execute a task over HTTP protocol. See Plan View for HTTP Tasks.
Slack task: Send a message from the Trifacta Application to a specified Slack channel. See Plan View for Slack Tasks.
Delete task: Delete files or folders from backend data storage as a task. See Plan View for Delete Tasks.
To cancel a plan that is currently running, please do the following:
In Plan View, click the Runs (x) link.
In the Run Details page, click Cancel plan run.