Run Job Page
In the Run Job page, you can specify transformation and profiling jobs for the currently loaded recipe. Available options include output formats and output destinations.
You can also configure the environment where the job is to be executed.
Tip
Jobs can be scheduled for periodic execution through Flow View page. For more information, see Add Schedule Dialog.
Tip
Columns that have been hidden in the Transformer page still appear in the generated output. Before you run a job, you should verify that all currently hidden columns are ok to include in the output.
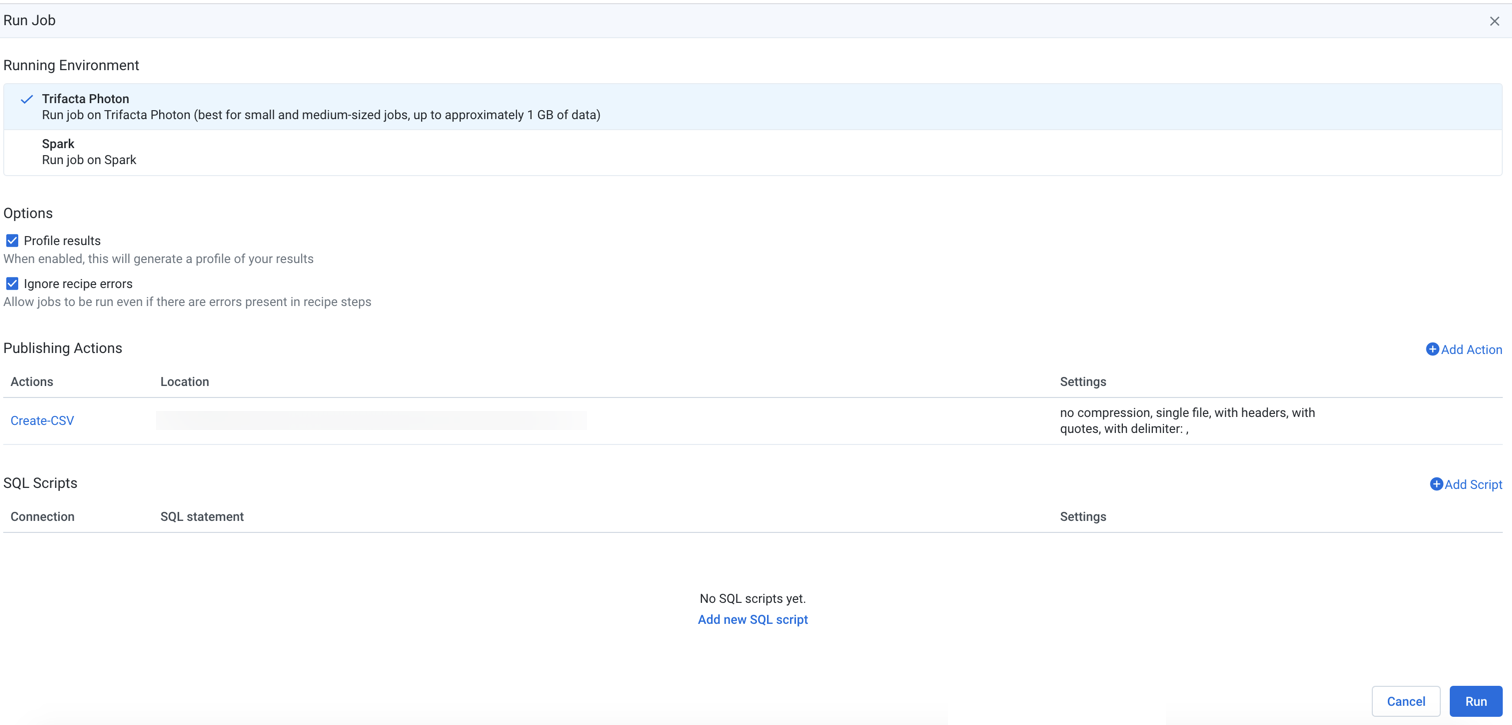
Figure: Run Job Page
Running Environment
Select the environment where you wish to execute the job. Some of the following environments may not be available to you. These options appear only if there are multiple accessible running environments.
Note
Running a job executes the transformations on the entire dataset and saves the transformed data to the specified location. Depending on the size of the dataset and available processing resources, this process can take a while.
Tip
The application attempts to identify the best running environment for you. You should choose the default option, which factors in the available environments and the size of your dataset to identify the most efficient processing environment.
Photon: Executes the job in Photon, an embedded running environment hosted on the same server as the Designer Cloud Powered by Trifacta Enterprise Edition.
Spark: Executes the job using the Spark running environment.
Advanced Execution Options:
If Spark job overrides have been enabled in your environment, you can apply overrides to the specified job. See Spark Execution Properties Settings.
This setting must be enabled. For more information, see Enable Spark Job Overrides.
Spark (Databricks): Executes the job on the Databricks cluster with which the platform is integrated.
Note
Designer Cloud Powered by Trifacta platform can integrate with AWS Databricks or Azure Databricks, but not both at the same time.
For more information, see Configure for AWS Databricks.
For more information, see Configure for Azure Databricks.
Note
Use of Databricks is not supported on Marketplace installs.
Options
Profile Results: Optionally, you can disable profiling of your output, which can improve the speed of overall job execution. When the profiling job finishes, details are available through the Job Details page, including links to download results.
Note
Percentages for valid, missing, or mismatched column values may not add up to 100% due to rounding.This issue applies to the Photon running environment.
See Job Details Page.
Ignore recipe errors: Optionally, you can choose to ignore errors in your recipes and proceed with the job execution.
Note
When this option is selected, the job may be completed with warning errors. For notification purposes, these jobs with errors are treated as successful jobs, although you may be notified that the job completed with warnings.
Details are available in the Job Details page. For more information, seeJob Details Page.
Publishing Actions
You can add, remove, or edit the outputs generated from this job. By default, a CSV output for your home directory on the selected datastore is included in the list of destinations, which can be removed if needed. You must include at least one output destination.
Columns:
Actions: Lists the action and the format for the output.
Location: The directory and filename or table information where the output is to be written.
Settings: Identifies the output format and any compression, if applicable, for the publication.
Actions:
To change format, location, and settings of an output, click the Edit icon.
To delete an output, click the X icon.
Add publishing action
From the available datastores in the left column, select the target for your publication.
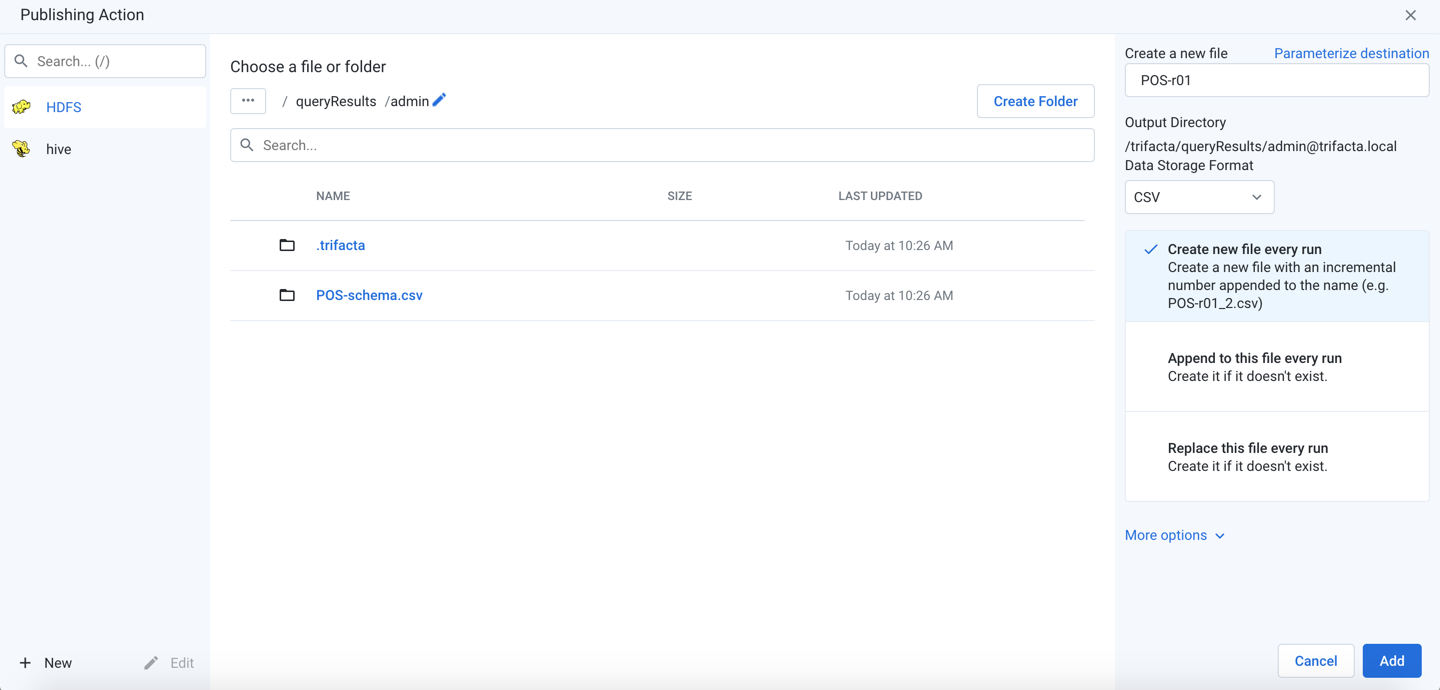
Figure: Add Publishing Action
Note
Do not create separate publishing actions that apply to the same file or database table.
New/Edit: You can create new or modify existing connections. By default, the displayed connections support publishing. See Create Connection Window.Steps:
Select the publishing target. Click an icon in the left column.
If Hive publishing is enabled, you must select or specify a database table to which to publish.
Depending on the running environment, results are generated in Avro or Parquet format. See below for details on specifying the action and the target table.
If you are publishing a wide dataset to Hive, you should generate results using Parquet.
For more information on how data is written to Hive, see Hive Data Type Conversions.
Locate a publishing destination: Do one of the following.
Explore:
Note
The publishing location must already exist before you can publish to it. The publishing user must have write permissions to the location.
Note
If your HDFS environment is encrypted, the default output home directory for your user and the output directory where you choose to generate results must be in the same encryption zone. Otherwise, writing the job results fails with a
Publish Job Failederror. For more information on your default output home directory, see Storage Config Page.To sort the listings in the current directory, click the carets next to any column name.
For larger directories, browse using the paging controls.
Use the breadcrumb trail to explore the target datastore. Navigate folders as needed.
Search: Use the search bar to search for specific locations in the current folder only.
Manual entry: Click the Edit icon to manually edit or paste in a destination.
Choose an existing file or folder: When the location is found, select the file to overwrite or the folder into which to write the results.
Note
You must have write permissions to the folder or file that you select.
To write to a new file, click Create a new file.
Create a new file: See below.
Create Folder: Depending on the storage destination, you can click it to create a new folder for the job inside the currently selected one. Do not include spaces in your folder name.
As needed, you can parameterize the outputs that you are creating. Click Parameterize destination in the right panel. See Parameterize destination settings below.
To save the publishing destination, click Add.
To update a publishing action, hover over its entry. Then, click Edit.
Todeletea publishing action, selectDeletefrom its context menu.
Variables
If any variable parameters have been specified for the datasets or outputs of the flow, you can apply overrides to their default values. Click the listed default value and insert a new value. A variable can have an empty value.
Note
Override values applied to a job are not validated. Invalid overrides may cause your job to fail.
Note
Unless this output is a scheduled destination, variable overrides apply only to this job. Subsequent jobs use the default variable values, unless specified again. No data validation is performed on entries for override values.
Tip
At the flow level, you can specify overrides at the flow level. Override values are applied to parameters of all types that are a case-sensitive match. However, values that are specified at runtime override flow-level overrides. For more information, see Manage Parameters Dialog.
For more information on variables, see Overview of Parameterization.
Output settings
Depending on the type of output that you are generating, you must specify additional settings to define location, format, and other settings.
Run Job
To execute the job as configured, click Run. The job is queued for execution.After a job has been queued, you can track its progress toward completion. See Job Details Page.
Automation
Run jobs via API
You can use the available REST APIs to execute jobs for known datasets. For more information, see API Reference.