Import Data Page
Through the Import Data page, you can upload datasets or select datasets from sources that are stored on connected datastores. From the Library page, click Import Data.
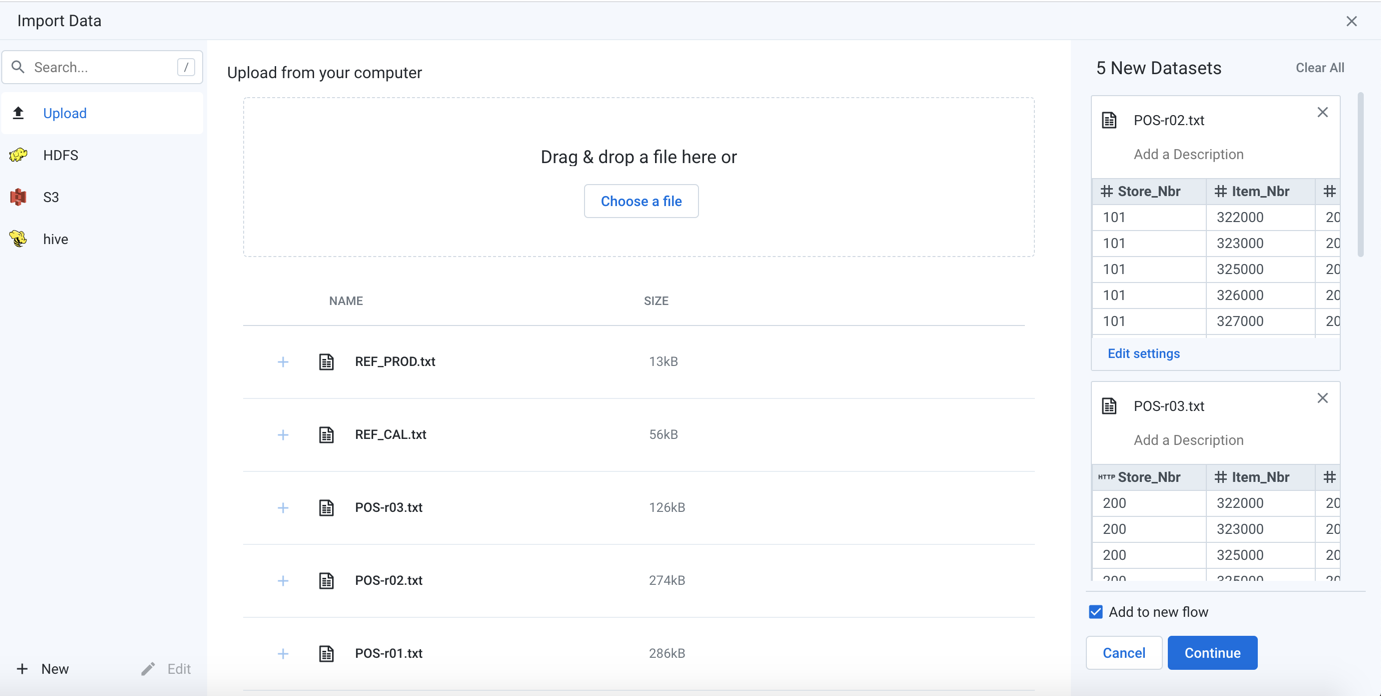
Figure: Import Data page
General Limitations
Note
For file-based sources, Designer Cloud Powered by Trifacta Enterprise Edition expects that each row of data in the import file is terminated with a consistent newline character, including the last one in the file.
For single files lacking this final newline character, the final record may be dropped.
For multi-file imports lacking a newline in the final record of a file, this final record may be merged with the first one in the next file and then dropped in the Trifacta Photon running environment.
Note
To be able to import datasets from the base storage layer, your user account must include the dataAdmin role.
Note
An imported dataset requires about 15 rows to properly infer column data types and the row, if any, to use for column headers.
File and path limitations:
The colon character (
:) cannot appear in a filename or a file path.Filenames cannot begin with special characters like dot (
.) or underscore(_).
Basic Workflow
1. Connect to sources
During import, theTrifacta Applicationidentifies file formats based on theextensionof the filename.
Compressedfiles are recognized and can be imported based on their file extensions.
Filenames that do not have an extension are treated as TXT files.
Upload:Designer Cloud Powered by Trifacta Enterprise Edition can also load files from your local file system.
Tip
You can drag and drop files from your desktop to to upload them.
Note
You can upload a file up to 1 GB in size.
Note
When you upload an updated version of a previously uploaded file, the new file is stored as a separate upload altogether. In your flow, you must swap out the old dataset to point to the new one.
HDFS: If connected to a Hadoop cluster, you can select file(s) or folders to import. See HDFS Browser.
Hive:If connected to a Hive instance, you can load datasets from individual tables within the set of Hive databases. See Hive Connections.
S3: If connected to an S3 instance, you can browse your S3 buckets to select source files.
Tip
For HDFS and S3, you can select folders, which selects each file within the directory as a separate dataset.
Redshift: If connected to an S3 data warehouse, you can import source from the connected database. See Amazon Redshift Connections.
WASB: If enabled, you can import data into your Azure deployment from WASB.
ADL: If enabled, you can import data into your Azure deployment from ADLS Gen1.
ADLS Gen2:If enabled, you can import data into your Azure deployment from ADLS Gen1.
Databases: If connected to a relational datastore, you can load tables or views from your database. SeeDatabase Browser.
Note
For long-loading relational sources, you can monitor progress through each stage of ingestion. After these sources are ingested, subsequent steps to import and wrangle the data may be faster.
For more information, seeConfigure JDBC Ingestion.
For more information, see Overview of Job Monitoring.
For more information on the supported input formats, see Supported File Formats.
New/Edit: Click to create or edit a connection. By default, the displayed connections support import.
Search:Enter a search term to locate a specific connection.
Note
This feature may be disabled in your environment. For more information, contact your Alteryx administrator.
2. Add datasets
When you have found your source directory or file:
You can hover over the name of a file to preview its contents.
Note
Preview may not be available for some sources, such as Parquet.
Click the Plus icon next to the directory or filename to add it as a dataset.
Tip
You can import multiple datasets at the same time. See below.
Excel files: Click the Plus icon next to the parent workbook to add all of the worksheets as a single dataset, or you can add individual sheets as individual datasets. See Import Excel Data.
If custom SQL query is enabled, you can click Create Dataset with SQL to enter a customized SQL statement to pre-filter the table within the database to include only the rows and columns of interest.
Warning
Through this interface, it is possible to enter SQL statements that can delete data, change table schemas, or otherwise corrupt the targeted database. Please use this feature with caution.
For more information, seeCreate Dataset with SQL.
If parameterization has been enabled, you can apply parameters to the source paths of your datasets to capture a wider set of sources. Click Create Dataset with Parameters. SeeCreate Dataset with Parameters.
3. Configure selections
When a dataset has been selected, the following fields appear on the right side of the screen. Modify as needed:
Dataset Name: This name appears in the interface.
Dataset Description: You may add an optional description that provides additional detail about the dataset. This information is visible in some areas of the interface.
Tip
Click the Eye icon to inspect the contents of the dataset prior to importing.
Tip
You can select a single dataset or multiple datasets for import.
You can edit any additional or optional settings for an individual dataset. Perform the following:
Steps:
Click Edit Settings from the card for an individual dataset in the right panel. The dialog box is displayed.
In the dialog box, select the required options and modify the settings.
File Import Settings: For more information, see File Import Settings.
TableImport Settings: For more information, see Table Import Settings.
4. Import selections
Single dataset
If you have selected a single dataset for import:
Tip
If present, you can click the Add to new flow checkbox, which adds the imported datasets to an Untitled flow. For more information, see Flow View Page.
Click Continue. The dataset is imported.
A recipe is created for it, added to a new flow, and loaded in the Transformer page for wrangling. See Transformer Page.
You can import multiple datasets from multiple sources at the same time. In the Import Data page, continue selecting sources, and additional dataset cards are added to the right panel.
Note
If you are importing from multiple files at the same time, the files are not necessarily read in a regular or predictable order.
Note
When you import a dataset with parameters from multiple files, only the first matching file is displayed in the right panel.
In the right panel, you can see a preview of each dataset and make changes as needed.

Figure: Import Multiple Datasets
If you have selected multiple datasets for import:
Tip
If present, you can click the Add to new flow checkbox, which adds the imported datasets to an Untitled flow. For more information, see Flow View Page.
To import the selected datasets, click Continue.
To begin transforming one of these datasets in Flow View, select it. From its context menu, selectAdd new recipe. Select the recipe. In the context panel on the right, selectEdit Recipe. SeeTransformer Page.
To remove a dataset from import, click the X in the dataset card.