Downgrade Alteryx Server
This article provides guidance on how to downgrade Alteryx Server.
Alteryx Server upgrades can sometimes lead to unforeseen complications, creating an urgency to either resolve or downgrade to avoid further disruption. You can resolve most issues with the resources on our Community page or contact Alteryx Support. In certain cases, you have to restore the latest working version to resolve the underlying problems.
Note
Prior to downgrading, you can search Alteryx Community and contact Alteryx Support to discuss the reasons to downgrade.
Important
Please ensure you have a backup of MongoDB prior to the upgrade. Without this, you will NOT be able to downgrade.
Important
If you have migrated from MongoDB to user-managed MSSQL, you will NOT be able to downgrade to a release earlier than 2024.1 because SQL Server support is only available starting in 2024.1.
To downgrade from a user-managed SQL environment, you need to first switch back to the last version of MongoDB you were using before you migrated to SQL. If you made a backup of your MongoDB before the migration, you can switch it out with your current SQL database. You can do this by updating the connection strings in Alteryx System Settings for the Controller and Server UI to point to the old MongoDB again. Refer to this knowledge article on Server Backup Recovery for more backup details. Note that by doing this, you will be reverting back to the MongoDB at the point in time you did the migration, so any changes made to the environment after the migration to SQL will not be present in your old MongoDB.
Environment
Alteryx Server (all versions)
Embedded or user-managed MongoDB (all versions)
Prerequisites
You must have Administrator permissions on the Server machine.
Server downtime (maintenance) window to perform downgrade.
Scheduling a Server downtime window is not a requirement and depends on your internal policies. The length of the downtime window is dependent on your setup and the size of the database.
Installer file for previous version of Server you are downgrading to.
MongoDB backup taken from the previous version that you are downgrading to. For more information, go to Alteryx Server Backup and Recovery Procedures article.
If you are downgrading from version 2022.3+ to a version older than 2022.3, the backup of the RuntimeSettings.xml file to upgrade to version 2022.3+ is required: C:\ProgramData\Alteryx\RuntimeSettings.22_2_legacy.xml
Downgrade Alteryx Server
This procedure shows how to downgrade from Alteryx Server to an older version that was running before in the same environment. For the purposes of this article, we are downgrading from Alteryx Server 2023.1 to 2022.3 as an example.
Connect to Alteryx Server. For multi-node environments, connect to the Controller Node hosting the embedded or user-managed MongoDB.
Open the Services.msc console and Stop the service.
For more information on how to stop the service, go to How To: Start the AlteryxService. In Procedure A described in this article, use Stop instead of Start.
To open the Control Panel, search for Control Panel in Start Menu.
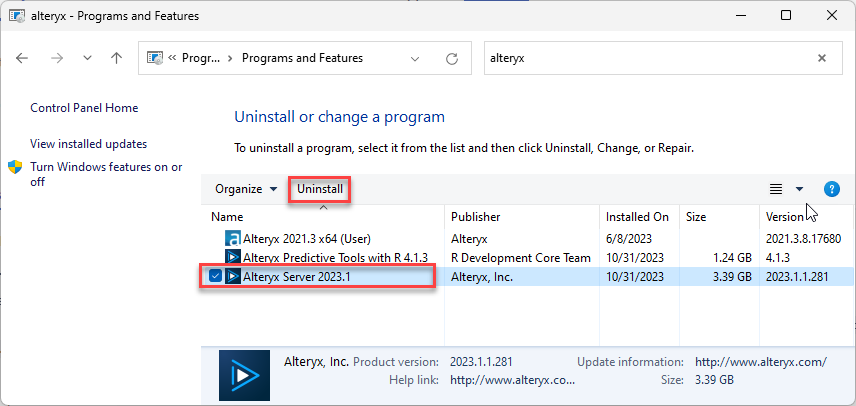
Select Programs and uninstall Alteryx Server 2023.1. The uninstaller will automatically also uninstall Alteryx Predictive Tools.

If you are downgrading from version 2022.3+ to a version older than 2022.3, you need to restore your original RuntimeSettings.xml.
Go to the folder where the RuntimeSettings.xml file is located (for example, %ProgramData%\Alteryx\RuntimeSettings.xml), right-click it, and select Rename. Then rename it to RuntimeSettings_rollback_bkp.xml.
In the same folder, rename RuntimeSettings.22_2_legacy.xml to RuntimeSettings.xml by right-clicking it and then selecting Rename.
Once completely uninstalled, run the Alteryx Server Installer for 2022.3 (or whichever version you are downgrading to). Right-click on the installer file and select Run as administrator.
Note
Make sure you’re downgrading to the exact same version you were previously on, down to the patch level. If you are not sure of which patch you were previously on, downgrade to the newest patch for that version.
Check the License Agreement and select Next.
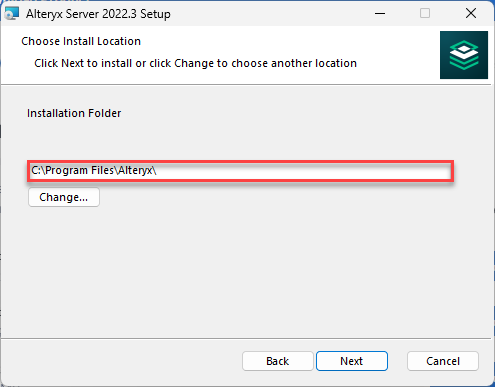
Select the folder path to install to if different from the default location, and select Next.

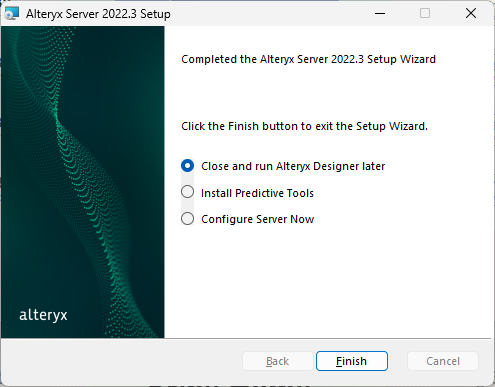
Once the installation is complete, you will be prompted to install Predictive Tools as shown in the image below. If you intend on staying on this version and have workflows that rely on Predictive Tools, select Install Predictive Tools, and then select Finish. If not, select Close and run Alteryx Designer later, and then select Finish.

Note
In multi-node environments follow the same process for each node.
Restore MongoDB
In the next step, restore your MongoDB database to the previous version.
At this point, Alteryx Service should still be in a stop state. To confirm, check the Services.msc console.
Rename the current Persistence folder to “MongoDB_failedUpgradeAttempt_to_version##”. While this folder is no longer in use, it’s best practice to avoid deleting files and folders during a Server incident.
Recreate the Persistence folder in File Explorer. The folder is now empty and ready for the database restore.
Restore MongoDB from the latest MongoDB backup taken from the version that you are downgrading to. The steps to restore the MongoDB and verify its success can be found in the Restore from a MongoDB Backup section on the MongoDB Backups help page.
Note
To confirm your Persistence folder, go to Alteryx System Settings > Controller > Persistence > Data Folder, or go to C:\ProgramData\Alteryx\RuntimeSettings.xml and search for <EmbeddedMongoDBEnabled>.
Post Downgrade Checks
Check the Server UI is accessible and the expected content, such as users, workflows, and schedules, has been successfully restored.
Check the Server logs for any unexpected locks. See the locations for log files in How To: Attach Server Log Files. If you see the errors below, delete the locks by running the Mongo command
db.locks.remove({}). On success you should see:writeResult({ “nRemoved” : N }), where N is a number between 0 and 3.2020-05-11 15:53:06.564593,FATAL,18,QueueWorker,RunOnce,,,,LD-LT-241,,,,,,Lock obtain timed out: MongoDB.Lucene.MongoDocumentLock->Retry in (1) seconds...,"Lucene.Net.Store.LockObtainFailedException: Lock obtain timed out: MongoDB.Lucene.MongoDocumentLock-context, String name)2020-05-11 15:33:59.700855,FATAL,20,QueueWorker,RunOnce,,,,LD-LT-241,,,,,,Failed to obtain IndexWriter lock.->Retry in (1) seconds...,System.Exception: Failed to obtain IndexWriter lock. -> at Alteryx.Server.Models.BackgroundThread.QueueWorker.RunOnce()
Note
If you don't feel confident with the process, please reach out to Alteryx Support for additional assistance.