Format Dates
Datetime values can be imported into Designer Cloud in a variety of formats.
Below are just a few examples of one date in different acceptable formats:
myDate |
|---|
Mar-14-2018 |
03/14/2018 |
2018-Mar-03 |
3/14/18 |
03/14/2018 00:00:00 |
March 14, 2018 |
This section describes the tools and approaches for standardizing and formatting your date values.
Recommended Approaches
When you are formatting a column of date values, you can attempt to standardize the values in the following order.
Option 1 - Patterns in the Column Details panel
Through the Column Details panel, you can review the set of patterns that match the values in your date column and select the ones to apply to standardize the values.
Steps:
From the column menu for your date column, select Column Details.
In the Column Details panel, click the Patterns tab.
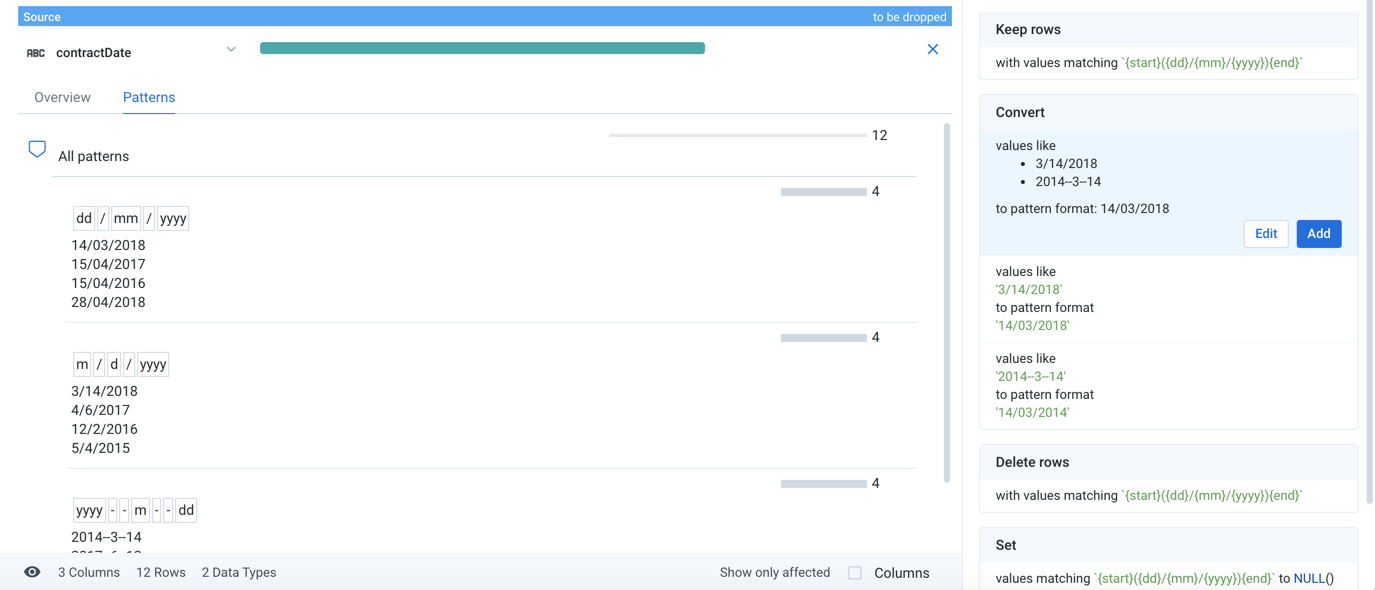
In the Patterns tab, you can review the set of patterns that describe all values that appear in the column. Select one that needs to be corrected.
In the right panel, select the Convert card.
Tip
If you do not see the Convert card, you might try to generate a new random sample, in which example patterns are more evenly distributed throughout the sample.

Figure: Select the Convert card in the Patterns tab
Click Add.
The number of patterns displayed in the Patterns tab is reduced. You can continue to select patterns to standardize values.
Iterate until there is only one pattern displayed in the panel.
For more information on Datetime patterns, see Standardize Using Patterns.
Option 2 - Patterns based on date format
In some cases, you may not be able to simply select patterns, which generates sufficient suggestions to standardize your date values. A second approach involves keying on mismatched values in the column.
Tip
This technique works for columns in which all values are valid Datetime values but are in different date formats. If you have values that are invalid for any date format, you must use Option 3 to correct the syntax errors using patterns first. See below.
In this case, you set the data type for the column to Datetime and use the DATEFORMAT function to match the format of the values that you want to change. Next to the values from the preceding table, you can see the corresponding date format token:
myDate | DATEFORMAT value |
|---|---|
Mar-14-2018 | MMM-dd-yyyy |
03/14/2018 | MM/dd/yyyy |
2018-Mar-03 | yyyy-MMM-dd |
3/14/18 | M/d/yy |
03/14/2018 00:00:00 | MM/dd/yyyy HH:mm:ss |
March 14, 2018 | MMMM dd, yyyy |
For purposes of this example, suppose your myDate column contains values in MM/dd/yyyy and M/d/yy format. You wish to standardize on MMMM dd, yyyy format.
Steps:
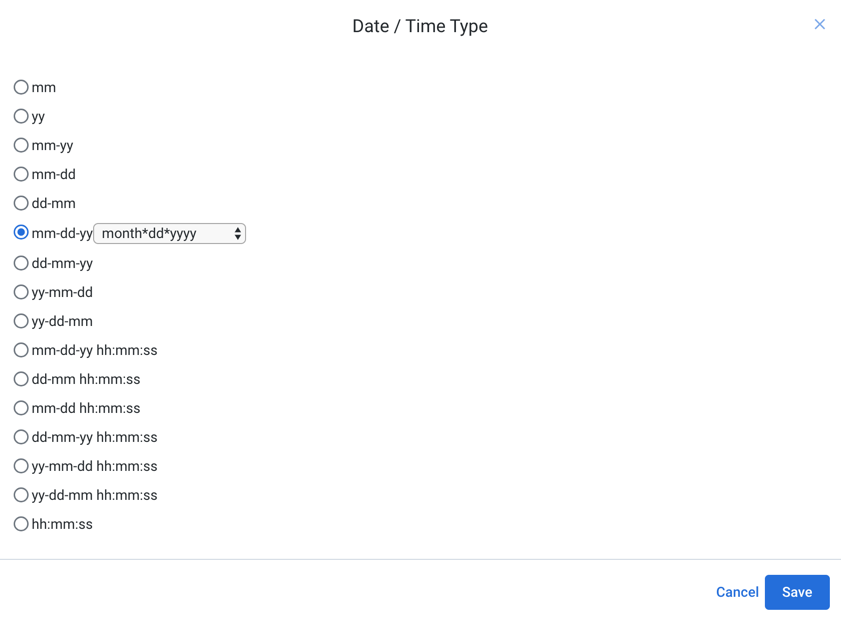
From the Data Type menu at the top of the
myDatecolumn, select Date/Time.In the dialog, select the Date format that matches values you wish to fix:

Figure: Date/Time format selector
Click Save.
Now, you need to modify the values that match this format to match the target format (
MMMM dd, yyyy). Click the green bar in the column, which matches the values for the currently valid Datetime format., Then click the Set suggestion. Click Modify.In the Transform Builder, you have a predefined transformation that sets values based on whether the column values are valid for the currently specified data type and format. You must replace the
NULL()entry with theDATEFORMATfunction which changes these values to the proper format:Transformation Name
Edit with formulaParameter: Columns
myDate
Parameter: Formula
ifvalid($col, ['Datetime','yy','yyyy'], dateformat($col, 'MMMM dd, yyyy'))
Click Add. All values that matched the
MM/dd/yyyyformat are converted to theMMMM dd, yyyyformat.Repeat the previous steps:
Set the column's Datetime format to:
M/d/yyyy.Select the green bar in the column data quality bar.
Select the Set suggestion and modify it.
For the value in the transformation, insert the following function:
ifvalid($col, ['Datetime','M/d/yyyy'], dateformat(myDate, 'MMMM dd, yyyy'))
Add the transformation to you recipe.
Repeat Step 7 for any other mismatched formats.
You may have some manual fixups to complete at the end. See below.
Option 3 - Transformation by Example
You can reformat dates by providing example output values for a listed source value. For a column of date values, you can begin providing example outputs for individual values, and Designer Cloud can perform pattern-based transformations to similarly formatted values. For more information, see Overview of TBE.
Option 4 - Manual fixups
Steps:
Now that you have selected a specific format for your Datetime values, the rows that do not match this format are now identified as mismatched in the column. Click the red bar at the top of the column.
In the Status bar at the bottom of the screen, click Show only affected rows.
You can now see only the rows that remain mismatched with respect to the preferred Datetime format.
Select one of these values. For example, suppose you have quite a few values that are only four-digit year values (
YYYY). Select one of the values. Then, select the Replace card. Click Edit.Your transformation should look like the following:
Transformation Name
Replace text or patternsParameter: Column
UpdateTime
Parameter: Find
`{start}{digit}{4}{end}`Parameter: Replace with
''
You can modify the search and replace patterns to capture and write back the year value:
In the Find value, put parentheses around the pattern that captures the four digits in a row. Adding parentheses around a matching pattern identifies that sub-pattern as a capture group, which can be referenced in any replacement.
The capture group should look like the following:
({digit}{4})For the Replace with value, you must insert a month and day value according to the format selected for the column (
MM/DD/YYYY), followed by a reference back to the capture group.Capture groups from the matching pattern can be referenced in the replacement value using references such as
$1,$2,$3, and so on. These tokens refer to the first, second, and third capture groups in the Find value.The Replace value should look like the following:
01/01/$1
Your transformation should look like the following when done:
Transformation Name
Replace text or patternsParameter: Column
UpdateTime
Parameter: Find
`{start}({digit}{4}){end}`Parameter: Replace with
01/01/$1
Click Add.
You can repeat these steps for the remaining mismatched values.
Custom Datetime Formats
You can create your own customized Datetime formats using the DATEFORMAT function. For example, the following changes the format of the lastDate function to use the yyyy:MM:dd format:
Transformation Name |
|
|---|---|
Parameter: Columns | lastDate |
Parameter: Formula | DATEFORMAT(lastDate, 'yyyy:MM:dd') |
Normalize Regional Differences
The following date values correspond to the same date but vary in format in different regions of the world:
Date Value | Region |
|---|---|
03/14/2018 | U.S. |
14/03/2018 | E.U. |
2014-03-14 | China |
In the above examples, the delimiters for the U.S. and E.U. values are identical, which makes parsing these values more challenging.
Tip
If your dataset contains date values from different regions of the world, you should find or create a separate column to identify the applicable region.
Suppose the previous set of dates was represented in your dataset with the following values:
contractDate | region |
|---|---|
03/14/2018 | USA |
14/03/2018 | EU |
2014-03-14 | CHN |
In this case, you might try the following generalized solution. You can use conditional transformations to extract the day, month, and year values from the contractDate column based on the value in the region column.
Note
This solution assumes that all date values within for a specific region (e.g. USA) are consistently formatted. You should perform those formatting actions first.
Steps:
First, you must split the column based on the cell value's delimiter. Note that the following transformation uses the Wrangle
{delim}to locate the delimiter in the cell value. This delimiter is either a dash or a slash.Transformation Name
Split by delimiterParameter: Column
contractDate
Parameter: Option
by Delimiter
Parameter: Delimiter
`{delim}`Create the following three conditional transformations for extracting the day, month, or year values based on the value in the Region column. Here is the transformation to acquire the year values:
Transformation Name
conditionsParameter: Condition type
Case on single column
Parameter: Column to evaluate
Region
Parameter: Case 1
'EU'
Parameter: Value 1
contractDate3
Parameter: Case 2
'USA'
Parameter: Value 2
contractDate3
Parameter: Case 3
'CHN'
Parameter: Value 1
contractDate1
For month:
Transformation Name
conditionsParameter: Condition type
Case on single column
Parameter: Column to evaluate
Region
Parameter: Case 1
'EU'
Parameter: Value 1
contractDate2
Parameter: Case 2
'USA'
Parameter: Value 2
contractDate1
Parameter: Case 3
'CHN'
Parameter: Value 1
contractDate2
For day:
Transformation Name
conditionsParameter: Condition type
Case on single column
Parameter: Column to evaluate
Region
Parameter: Case 1
'EU'
Parameter: Value 1
contractDate1
Parameter: Case 2
'USA'
Parameter: Value 2
contractDate2
Parameter: Case 3
'CHN'
Parameter: Value 1
contractDate3
You can now bring together these three columns:
Transformation Name
Merge columnsParameter: Columns
day, month, year
Parameter: Separator
'/'
Parameter: New column name
newDate
You now have your new date column. You may need to reformat it into a preferred format.
Delete the columns that were created during this process.