Plan View for HTTP Tasks
During the execution of your plan, you can create a task to send HTTP requests to a third-party application endpoint. For example, when a preceding task successfully executes, you can send an HTTP message to a designated endpoint with information from that task.
In Plan View, you can create HTTP tasks to send a request to endpoints before or after the execution of other tasks. Also, you can use the HTTP task to generate a dataset with API call response that can be used in Designer Cloud workflow. These tasks are specified in the right context panel.
An HTTP task is a request between Alteryx Analytics Cloud (AAC) and another application. These requests are delivered using HTTP and can be interpreted by the receiving application to take action.
Nota
Your receiving application may require that you whitelist the host and port number or IP address of the platform. Please refer to the documentation for your application.
An HTTP task is one of the task types available in a plan. For more information, go to Plan View Page.
Limitations
For the Input Dataset (Load Configuration from Dataset):
Rows: 10,000.
File size: 1 GB.
Row size: 100 MB.
HTTP-based requests have a 30-second timeout limit.
Custom security certificates cannot be used.
Prerequisites
Requirements for receiving application
To send an HTTP request to a target application, the application must be configured to receive the request:
Requests from outside of the application domain must be enabled.
Nota
Your receiving application may require that you whitelist the host and port number or IP address of the platform. Please refer to the documentation for your application.
You must acquire the URL of the endpoint to which to send the HTTP request.
You must acquire any HTTP headers that must be inserted with each HTTP request.
If the request must be signed, additional configuration is required. Details are below.
Create Task
Drag and drop the HTTP task from the left pane to the Plan canvas.
In the right panel, select HTTP task. The HTTP task panel is displayed.
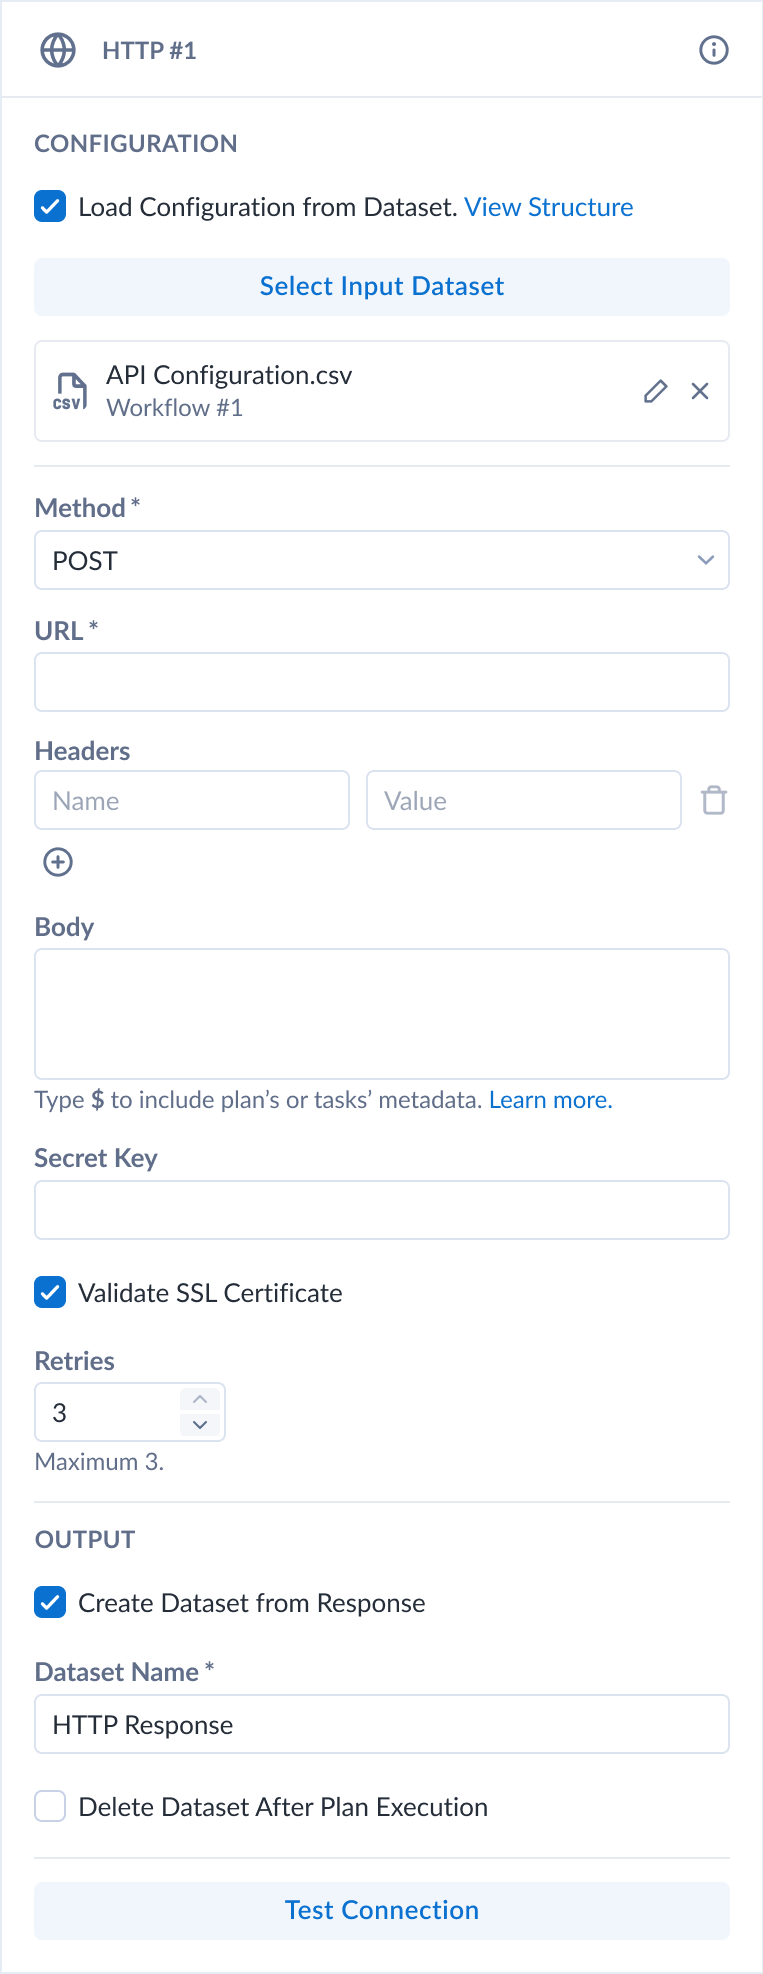
Figure: HTTP task
Field | Description |
|---|---|
Method | Select the HTTP method to use to deliver the message. The appropriate method depends on the receiving application. Most use cases require the |
URL | URL where the HTTP request is received by the other application. |
Headers | Insert HTTP content headers as key-value pairs. For example, if your body is in JSON format, you should include the following header: key: Content-Type value: application/json Nota You may be required to submit an authentication token as the value for the |
Body | ( {"text":"My text message to the receiving application."}Dica As part of the request body or header fields, you can insert metadata references to the plan definition, current run, tasks already executed in the run, and, column data and data sources. For more information on the available metadata, see Plan Metadata References. |
Secret Key | (Optional) A secret key can be used to verify the request payload. This secret value must be inserted in this location, and it must be included as part of the code used to process the requests in the receiving application. Insert the secret value here as a string without quotes. |
Validate SSL Certificate | When set to Nota If you must send a request to an endpoint that has an expired/invalid certificate, you must disable SSL verification. |
Retry | If the returned status code is outside of the 200-299 range, then the HTTP task is considered to have failed. When this option is enabled, the request is retried. If the request fails, this value defined the number of times that the request should be retried. If this number of retries is reached without success, the task fails. |
Create Dataset from Response | When set to |
Configure task
Set the required parameters. For more information on parameters, go to Plan View for HTTP Tasks.
You can specify plan metadata information in the header values and request body of your request. For more information, go to Plan Metadata References.
To test the connection, click Test. A success message is displayed.
Dica
A status code of
200indicates that the test was successful.Dica
You can use the GET method for testing purposes. A GET request does not change any data on the target platform but may permit you to specify elements in the request body.
To add the task, click Save.
Rename Task
To rename the task, click More menu > Edit in the right panel.
Dica
Good naming may include the target platform endpoint and method, as well as the purposes of the task in your plan.
Delete Task
To delete the task, click More menu > Delete. Confirm that you wish to delete the task.
Atenção
This step cannot be undone.
Plan Metadata References
Within the message of your other tasks, you can reference metadata about the plan, its tasks, and their execution. For more information, go to Plan Metadata References.
Examples
Slack channel message
Dica
Slack tasks are now a supported product feature.
You can create an HTTP task to deliver a text message to a Slack channel of your choice.
Set up your Slack installation to receive HTTP messages:
If needed, create a Slack channel to receive your messages.
Create an app.
Activate incoming HTTP messages for your app.
Specify the channel to receive your incoming messages.
Copy the URL for the incoming HTTP request from the cURL statement.
Parameter | Description |
|---|---|
Name | This name only appears in AACAAC. |
Method | Select the |
Url | Paste the URL that you copied from Slack. |
Headers | Copy the content headers from the Slack cURL command: key: Content-Type value: application/json |
Body | {"text":"Your job has completed."} |
Click Test to validate that this task will work.
Run a job and check the Slack channel for a message.
Plan metadata examples
You can reference metadata information from the plan definition and the current plan run as part of the request of your HTTP task.
Notes:
You can only insert metadata references for tasks that have already occurred in the plan run before the HTTP task begins.
Each task in the current run is referenced using a two-letter code. Example:
{{$http_xx.name}}
A plan metadata reference is constructed using the following syntax. In the appropriate textbox, enter one of the following values:
Dica
Start by typing $, which provides access to a menu tree of metadata references for each of the metadata reference types. The final syntax is noted above.
Plans:
Metadata information from the plan definition or the current plan run:
{{$planThe following request body contains references to the Plan name, plan run identifier, and the flow that was just executed:
{"text":"Plan: {{$plan.name}}
RunId: {{$plan.runId}}
Flow: {{$flow_7p.name}}
Success."}The following request body contains plan execution information using timestamps:
{"text":"Plan: {{$plan.name}}
RunId: {{$plan.runId}}
- plan start: {{$plan.startTime}}
Running time: {{$plan.duration}}

Times:
- last task start: {{$flow_7p.startTime}}
- last task end: {{$flow_7p.endTime}}
"}You can reference information from an HTTP task that has already occurred:
{"text":"{{$http_qg.name}} returned {{$http_qg.statusCode}}."} For more information, see Plan Metadata References.
Feed metadata inputs to the cloud function
This example demonstrates how you can use an HTTP task to deliver plan metadata to AWS Lambda functions. A similar approach could be used for Google Cloud functions.
In this case, the rowCount value from the flow task execution is delivered via an HTTP task to an AWS Lambda function.
General steps:
Define your plan.
Flow task: Run the flow to generate the outputs needed for your Lambda function.
HTTP task: generates an HTTP request whose body includes a reference to the rowCount metadata variable. Request body:
{
 "rowCount": "{{$flow_7p['My Flow Name'].output['My output name'].rowCount}}"
}
AWS Lambda functions: The following is pseudo-code for Lambda:
import json
def lambda_handler(event, context):
  httpTaskBody = json.loads(event["body"])
  rowCount = httpTaskBody["rowCount"]

  return {
    'statusCode': 200,
    'body': json.dumps(rowCount)
  }
Google Cloud functions: The following is pseudo-code for Google Cloud functions:
def get_row_count(request):
  request_json = request.get_json()
  if request_json and 'rowCount' in request_json:
        rowCount = request_json['rowCount']
    return rowCount
  return 'No rowCount attribute provided'
Create a dataset with API response for Designer Cloud workflow
Use the HTTP task in Plans to read and produce datasets with API call responses that can be used naturally in the Designer Cloud workflow.
Parameter | Description |
|---|---|
Name | This name only appears in AACAAC. |
Method | Mandatory field. Select the |
URL | Mandatory field. URL where the HTTP request is received by the other application. Example: |
Headers | HTTP content headers as key-value pairs in a JSON format. {
"X-Custom-Header": "value",
"X-Parametrized-Header": "${wf1.id}"
} |
Body | The body of the request submitted to the receiving application. Can contain {"text":"My text message to the receiving application."} |
General steps:
Create a workflow with your input.
Create and run a Plan with an HTTP task to generate a dataset.
Make sure to deselect the Delete dataset with API call response check box, setting the task to keep the dataset.
In Designer Cloud, use the dataset generated in the previous step to create a workflow starting with the API response.
By selecting the Load Configuration from Dataset checkbox, you are able to load a configuration (with all parameters) from the output dataset of the upstream workflow task.
Cuidado
See the Limitations section for the Input Dataset limits.
In Plan, add the workflow as a downstream task for an already existing HTTP task. Modify the Plan to use the HTTP task output (specified in Step 1) as the Designer Cloud workflow input.
You can schedule the Plan now. This setup makes an API call, the response is passed to the Designer Cloud workflow, and executed. The final output is available as usual.
Verify Signatures
Atenção
Depending on the target application, implementing signature verification may require developer skills.
Optionally, you can configure the platform to sign the HTTP requests. Signed requests guarantee that the requests are sent from the platform, instead of a third party.
Below, you can review how the signature is created, so that you can configure the receiving application to properly process the signature and its related request.
Signature Header
HTTP requests are signed by inserting the X-Webhook-Signature header in the request. These signatures are in the following form:
X-Webhook-Signature: t=<timestamp>,sha256=<signature>
where:
<timestamp>- Timestamp when the signature was sent. Value is in UNIX time.<signature>- SHA256 signature. The platform generates this signature using a hash-based message authentication code (HMAC) with SHA-256.
More information on these values is available below.
Example:
X-Webhook-Signature: t=1568818215724,sha256=55fa71b2e391cd3ccba8413fb51ad16984a38edb3cccfe81f381c4b8197ee07a
Check Application Tools
Depending on the application, you may need to complete one of the following sets of tasks to verify the task signatures:
Nota
You may need to whitelist the platform in your application. See the application's documentation for details.
You may be required to create some custom coding for your application. Below, you can review details on how to do so, including a JavaScript example.
Process Signed Requests
The timestamp value (t=<timestamp>) appears at the beginning of the header value to prevent replay attacks, where an attacker could intercept a valid payload and its signature and re-transmit them.
To avoid such attacks, a timestamp is included in the signature header and embedded in the signed payload.
Since the timestamp is part of the signed payload, an attacker cannot change the timestamp value without invalidating the signature.
If the signature is valid but the timestamp is too old, you can reject the request.
For example, if you receive a request with a timestamp that corresponds to a date from one hour ago, you should probably reject the request.
For more information on replay attacks, go to https://en.wikipedia.org/wiki/Replay_attack.
The task signature includes, as part of its hashed value:
The secret key (entered above)
The timestamp value
Request data:
(POST/PUT/PATCH) - the body of the request
(GET/DELETE) - URL of the request
Split the X-Webhook-Signature header:
Split values using the , character as a separator.
Split each of the parts using the = character.
Extract the values for the timestamp and signature. From the above example:
timestamp:
1568818215724signature:
55fa71b2e391cd3ccba8413fb51ad16984a38edb3cccfe81f381c4b8197ee07a
In the receiving application, you can recompute the signature to verify that the request was sent from the platform.
Concatenate the timestamp, the dot character . and the request body (POST/PUT/PATCH methods) or the URL (GET/DELETE methods).
Suppose the above example is the signature for a
POSTrequest, and the request body istest. The concatenated value is the following:1568818215724.test
You can now compute the HMAC authentication code in your receiving application. In the following JavaScript example, the secret key value is
mySecret:const crypto = require('crypto'); const message = '1568818215724.test'; // as defined above const hmac = crypto.createHmac('sha256', 'mySecret'); hmac.update(message) const expectedSignature = hmac.digest('hex');
The value returned by your code and the value included as the signature in the X-Webhook-Signature header should be compared:
If the values do not match, reject the request.
If the values do match, compute the difference between the current timestamp and the timestamp in the header. If the difference is outside of your permitted limit, reject the request.
Otherwise, process the request normally in your application.
Load HTTP Configuration from Dataset
In case you need to create a dynamic API request or multiple requests, you can use Designer Cloud to define a an output with the configuration and pass this output to the HTTP task in Plans.
To define an output with the configuration and use it for the HTTP task, follow these steps:
Create a workflow in Designer Cloud. For more information, go to Criar fluxos de trabalho.
In the workflow, set an output file format as CSV that contains following columns (names are case-insensitive):
Method (string, values: GET | POST | DELETE | PUT),
URL (string, the request URL),
Headers (string, the list of headers with values in a format {“Name”:“Value”, “Name”:“Value”, ...}),
Body (string).
Go to Plans and create a plan.
Add a Designer Cloud task and select the newly created workflow.
Add an HTTP task after the Designer Cloud task and connect it with a connector line.
In the HTTP configuration, select the Load Configuration from Dataset checkbox and the Load Configuration from Dataset checkbox.
Hit the Select Input Dataset button.
Choose the Designer Cloud task and its output data with the HTTP configuration.
Select Confirm.
The Create Dataset from Response checkbox will be automatically selected. You can customize the name of the dataset and run the Plan.
Nota
Each row in the configuration output file leads to a separate request. The response from each request will be added as a row in the output dataset.
Use HTTP Response as Input for Downstream Task
Once you set the HTTP task to create a dataset from a response, you can use this dataset as an input to downstream tasks.
To use the dataset as an input to a downstream task, follow these steps:
In the HTTP Configuration, select the Create Dataset from Response checkbox.
Add a Designer Cloud task after the HTTP task and connect it with a connector line.
In the Designer Cloud task, select the desired workflow.
In the list of workflow inputs, select Override on the input you want to override with the HTTP response.
Select the HTTP task and its output.
Select Confirm and run the Plan.