 Pythonツール
ツールごとに学習
Pythonには「ツールごとに学習」が用意されています。サンプルワークフロー を参照して、Alteryx Designerでこのサンプルやその他の多くのサンプルに直接アクセスする方法を確認してください。
Python ツールは、Python ユーザー向けのコードエディターです。このツールを使用する前に、Python を習熟しておく必要があります。
Alteryx Python パッケージをインポートしたら、Alteryx.help を実行します。便利な関数についての詳細:
from ayx import AlteryxAlteryx.help()
重要
Designer はカスタム Python コードを受け入れますが、Alteryx はカスタム Python コードをサポートしていません。
はじめよう
Python ツールの設定ウィンドウは、Jupyter Notebook に似ています。Jupyter Notebookに慣れていない場合は、[ヘルプ] > [ユーザーインターフェースツアー]、または[ヘルプ] > [Notebookヘルプ]にアクセスしてください。コードに関するサポートについては、[ヘルプ]でその他の資料をご確認ください。
注記
このツールはJupyter Notebookのインターフェイスとよく似ていますが、一部のオプションでは、予想とは異なる動作をする場合があります。
必要なデータサイエンスパッケージのインストール
Python ツールには、次のデータサイエンスパッケージが含まれています。
ayx: Alteryx API
jupytar: Jupyter metapackage
matplotlib: Python plotting package
numpy: NumPy、数値、文字列、レコード、およびオブジェクトの配列処理
pandas: データ分析、時系列、統計のための強力なデータ構造
requests: 人間のための HTTP
scikit-learn: 機械学習とデータマイニングのための Python モジュールの一式
scipy: SciPy, Python のための科学技術計算
six: Python 2 および 3 と互換性のあるユーティリティ
SQLAlchemy: データベース抽象化ライブラリ
statsmodels: Python の統計計算および統計モデル
追加のパッケージインストール
使用する Designer のバージョンに応じて、Alteryx.installPackages の関数を使用して追加のパッケージをインストールできます。たとえば、kerasを以下のようにインストールします。
   from ayx import Package

Package.installPackages("keras")
追加の Python パッケージをインストールできるのは、Designer を管理者として実行している場合のみです。管理者以外のユーザーは、追加のPythonパッケージをインストールできません。
入力の接続
Python ツールは複数入力に対応します。入力を接続した後、ワークフローを実行して入力データストリームをキャッシュする必要があります。次の手順に従って、受信データ接続にアクセスします。
1.Alteryx ライブラリをインポートします。
from ayx import Alteryx
2.接続にアクセスし、データ参照として使用する変数を入力します。
   # Use the method this method to read data from the reference. Replace "CONNECTION_NAME" with the name of your connection.

data1 = Alteryx.read("CONNECTION_NAME")

# Read in all connections and reference the returned zero-index array. Replace "INDEX_NUMBER" with the appropriate index number from the array.

Alteryx.read(Alteryx.getIncomingConnectionNames()[INDEX_NUMBER])
3.Python ツールの操作を開始する前に、ワークフローを実行してください。これにより、データがキャッシュされ、ツールにアクセスできるようになります。
注記
Python ツールは、データを Pandas データフレームとして扱います。詳細については、pandas.pydata.org を参照してください。
ツールの設定
ワークフロー実行モードの設定
Python ツールを使用するには、次の 2 つのモードを使用できます。
インタラクティブ モードを使用して開発を開始します。
実稼働モードを使用すると、開発が完了して標準のPythonインタープリターを使用してコードを実行する場合に速度が向上します。
[インタラクティブ]ボタンを選択します。開発には、このモードを使用します。このモードでは、ワークフローを再実行してコードの結果を確認する必要なく、Jupyter Notebook を介して受信データを操作できます。
ワークフローを実行すると、Designerは以下のタスクを実行します。
Designer は、受信データのコピーをキャッシュし、Python ツールで使用できるようにします。
Jupyter シェルは Notebook でコードを実行します。
コードがメソッド
Alteryx.write()を呼び出すと、Jupyterシェルが出力アンカーから結果を送信します。Jupyter Notebookには、[すべて実行]を選択した場合と同様に、すべてのエラー、警告、印刷ステートメントが表示されます。
[プロダクション]ボタンを選択します。実稼働のモデルには、このモードを使用します。このモードでは、DesignerがJupyter NotebookのすべてのPythonセルを1つの読み取り専用スクリプトに統合します。Designer は、そのスクリプトを Python インタープリターに渡します。
ワークフローを実行すると、Designer は次のタスクを実行します:
Jupyter シェルをバイパスし、標準の Python インタープリターを使用して読み取り専用スクリプトを実行します。
エラー、警告、印刷ステートメントは表示されません。
実稼働モードスクリプトを編集するには、[インタラクティブ]モードを選択した後、Jupyter Notebookのセルを編集します。編集の完了後、[プロダクション]モードを選択します。
データストレージ形式の設定
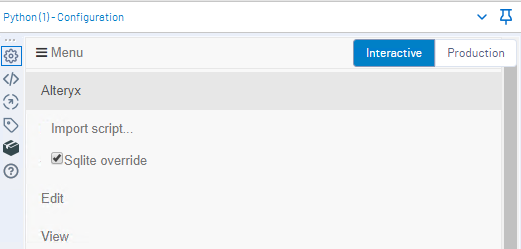
Python ツールには、SQLite と YXDB の 2 つの形式オプションがあります。
Python ツールの設定ウィンドウで、Alteryx メニューを選択します。
[Sqlite override]を選択します。

YXDB データストレージ形式を使用するには、次の手順に従います。
Python ツールの設定ウィンドウで、Alteryx メニューを選択します。
チェックマークを削除するには、[Sqlite override]の選択を解除します。
SQLite | YXDB | |
|---|---|---|
Blob | サポートなし | サポート |
空間オブジェクト | サポートなし | Python ツールと他のツールの間に空間オブジェクトを渡します。Python ツールから空間オブジェクト出力を作成する場合は、メタデータタグを使用します。 |
列の制限 | 制限は 2000 です | 制限なし |
Null 値 Note | サポートなし | Designer は、数値列または byte 列を float64 データ型 (倍精度浮動小数点型) に変換します。 |
行の配置を変更しない場合、または GeoSpatial Python を使用する場合は、GeoSpatial データをデータセットから切り取り、Python ツールの後に再結合することをお勧めします。その理由は、 Alteryx Binary テキストと GeoSpatial テキストとの間の変換が遅いためです。
ファイルまたはディレクトリのインポート
ファイルまたはディレクトリは、次の 2 つの方法でインポートできます。
Alteryxメニューのインポート機能を使用して、個々のPythonスクリプトまたはJupyter Notebookをインポートします。
import コマンドを使用してディレクトリをインポートします。
次の手順に従って、インポート機能を使用して Python スクリプトまたは Jupyter Notebook をインポートします。
Alteryxメニューを選択します。
[スクリプトをインポート]を選択します。
[ファイルを選択]を選択します。
.pyまたは.ipynbファイルに移動し、[インポート]を選択します。
カーネルメニューを使用する
[カーネル]メニューから以下のコマンドを実行できます。
処理を停止するには、[中断]を選択します。
処理を再開するには、[再起動]を選択します。
即時結果のワークブックを消去するには、[再接続]を選択します。
[カーネルの変更]は機能しません。
Alteryxでは、[シャットダウン]の選択は推奨していません。
ベストプラクティス
次のベストプラクティスは、Python ツールを正常に使用するのに役立ちます:
Engine.WorkflowDirectory などのワークフロー定数を参照する場合は、Alteryx.getWorkflowConstant メソッドを使用します。そうしない場合、コードの実行時に、コマンドの結果または出力がJupyter Notebookのコマンドに完全に置き換わります。
警告
ワークフロー定数で % ラッパーを使用しないようにします。たとえば、代わりに以下を使用して Engine.WorkflowDirectory を呼び出します。
from ayx import Alteryx
Alteryx.getWorkflowConstant("Engine.WorkflowDirectory")
ツールからのデータ出力
Alteryx.write メソッドを使用して、ツールからデータを出力します。
キャンバス上の他のツールにデータを送信するには、次の方法を使用します:
   # Replace "PANDAS_DF" with your data, in DataFrame form.
# Replace "OUTPUT_ANCHOR_NUM" with the number of your output anchor.

Alteryx.write(PANDAS_DATAFRAME, OUTPUT_ANCHOR_NUM)
Alteryx.write メソッドは、Pandas データフレームのみを受け入れます。別の形式のデータがある場合は、Pandas ライブラリを使用してデータフレームに変換します。Pandas ライブラリは、Designer の一部として既にインストールされています。import pandas と Jupyter Notebook でそれにアクセスします。
最大 5 つのデータフレームを出力アンカーに送信できます。
