Load Metadata from an Alteryx Server Gallery
Use the Alteryx Loader to upload Gallery workflows and Alteryx Insights metadata to Alteryx Connect.
Review Loader Requirements
The Alteryx Connect Loaders must be installed on the machine where Alteryx Server is installed. To install the loaders:
Download the loaders installer. For compatibility, the Loaders installer version must match the Alteryx Connect version.
Run the installer as an administrator.
Alteryx Predictive Tools with R must be installed. See Predictive Analytics.
An Alteryx Server Gallery must be accessible by the workflow. For more information, see the Alteryx Server Help for Administrators.
Enable the Admin API and obtain the Admin API Key and Secret:
Log in to the Gallery as a Curator.
Go to Settings and select the Keys tab.
Enable the Admin API.
Copy the Key and Secret.
Workflows/Macros/Apps should be published to the Gallery.
For lineage requirements, see Maintain Data Lineage.
Open the Loader
Open Alteryx Designer.
Select Help > Sample Workflows > Alteryx Connect Metadata Loaders > Alteryx Loader > Alteryx Loader.
Run the App
Do this first...Clear Stage Area
Due to a change in Server authentication, the keyword (Load code) used to process data in Connect has been changed. To ensure that existing records are updated, you need to manually clear the stage area for the AYX loader before running it. We recommend that you perform a backup before you clear the stage area.
To clear the stage, go to the Administration Console. Select Maintenance > Stage. Locate your company's Server by load code—typically http://yourserver/gallery/gallery/api/admin/v1. To make sure it's really the stage you're looking for, look for keywords containing 'AYX_WF' in the Statistics column. Select the trash icon for that stage.
Select Run as Analytic App

.
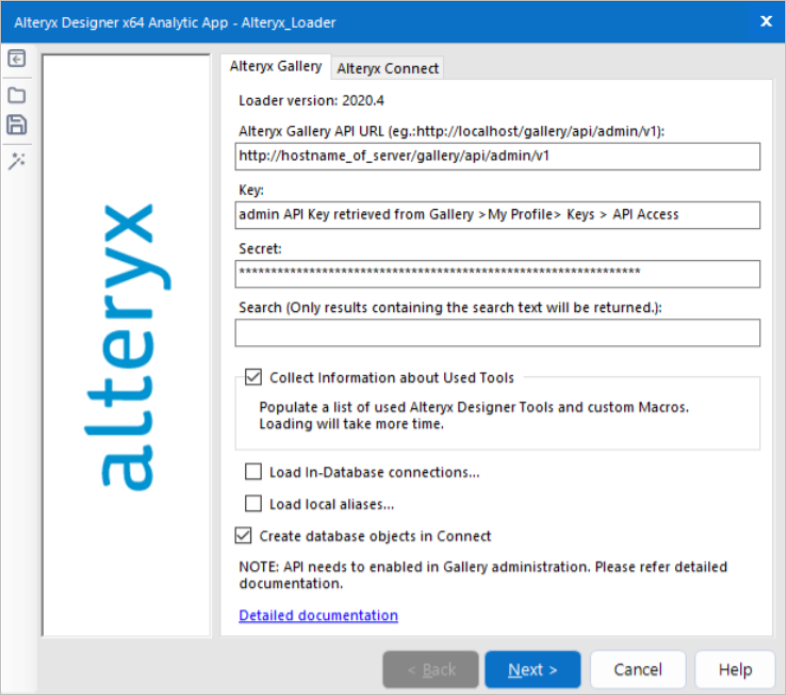
In the Alteryx Gallery tab:
Type the Gallery API URL http(s)://<machinename>/webapi
Enter the Gallery API Key dan Secret.
In Search, optionally type any search text to limit results.
Load Database Objects
To quickly get an overview of used database data sources, especially in the case of new Connect deployment, use the Load Database Objects option when loading the objects from the AYX Gallery.
When you use the AYX Gallery loader, the workflow objects are created in Connect.
If you enable the Load Database Objects option, the loader will try to also create the database objects.
Their creation is based on the information stored in the workflow input tools. The input tool has to provide full information about the object (servername, catalog name, schema, and table; columns are not supported).
These objects will be visible after loading in Data Sources > Databases. The lineage will be established as well and visible in the given workflow in the Data Connections section, column Input. By selecting an input, you will be redirected to the selected data source.
To enable creating database objects in Connect during loading workflows from the Alteryx Gallery, check the Create database objects in Connect box.
You can combine the Load Database Objects option with the proper database loader to enhance the content with other tables (not just the ones used in analytic workflows) and add information about columns and more.
Note that because it's not possible to distinguish the proper object type from the workflow itself, all base objects such as tables and views are created as tables.
Loading database objects might create many duplications with different names. Apply Alias Manager to fix the duplications and merge them under the same name.

3. In the Alteryx Connect tab, type the URL for your Alteryx Connect instance and your credentials.
https://yourcompany.alteryxconnect.com
4. Before running the app, select  and save the app configuration to the following directory:
C:\ProgramData\Alteryx\AlteryxConnect\Alteryx_Loader\
The .yxwv app values file is used for scheduling the loader to run in the Gallery. See Schedule Metadata Loaders.
5. Select Finish to run the app.
Depending on how much metadata is being imported, the app can take a long time to run.
If the run succeeds, "Success" appears in the App Results window.
If the run fails, a "There were Errors" message appears.
View the Metadata
Go to the Alteryx Connect URL and log in.
From the main menu, select Data Sources.
Select a folder to view its contents.