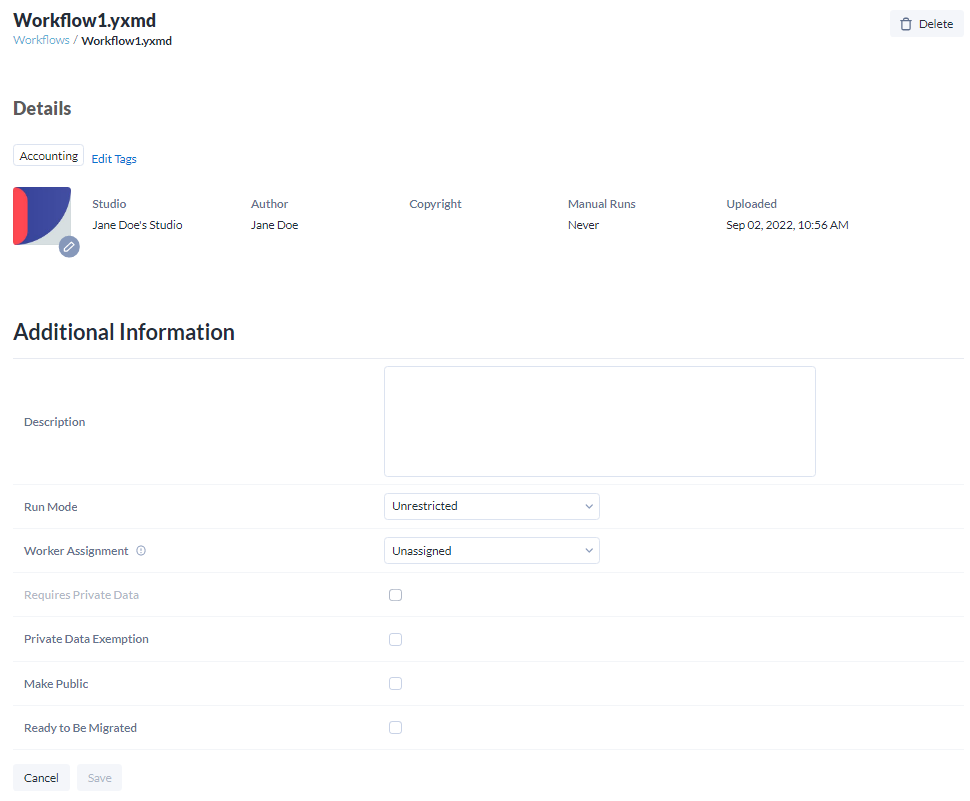
Workflow Options in Admin
These options are available on the workflow details page of the Admin interface. There is some overlap between the options on this page of the Admin interface and the workflow details page of the Server user interface. Go to Workflow Options in Server UI for workflow options available in Server user interface.

Uploaded: Date workflow was uploaded and Server user who uploaded the workflow.
Studio: The private studio where the workflow is located.
Manual Runs: The number of times all users who have access have run the workflow.
Tags: To add a new tag, select Edit Tags, and select the tags you want to apply. To remove a tag, select Edit Tags, then deselect the tag you want to remove. To confirm your changes, select Save.
Change Icon: To change the workflow icon, select the pencil icon in the bottom right corner of the existing icon. Then browse for a new icon in the Upload Workflow Icon window, then select Upload.
Name: The name of the workflow. Not editable in the Server admin interface.
Author: The workflow author as specified in the Meta Info tab in Designer. Not editable in the Server admin interface.
Description: Enter a description for the workflow in the Description field.
Copyright: Copyright info specified in the Meta Info tab in Designer. Not editable in the Server UI.
Run Mode: Use Run Mode to block specific tools or access. The Server admin selects the Default Run Mode during server configuration. Go to the Server UI help page for more info. To change the RunMode for the workflow, select a setting from the drop-down.
Unrestricted: Server users can run the workflow regardless of tools or access.
Semi-safe: Blocks Server users from running the workflow if it reads data from or writes data to a location that is not within the directory or sub-directory of the workflow staging directory (workspace).
Safe: Blocks Server users from running the workflow if it reads data from or writes data to a location that is not within the workflow staging directory (workspace). Server users are also blocked from running the workflow if it uses specific tools, events, and data connectors. Go to the
Safe and Semi-safe Run Modes: Blocked Tools, Events, and Data Connectors help page for more info.
Note
Semi-safe and Safe are only available if the Server admin has enabled the Run As setting in System Settings on the Worker > Run As screen or if a Run As user is specified. Go to the Worker and Credentials help pages for more information.
Worker Assignment: To change the worker that runs the workflow, select a worker from the drop-down. If a worker is not assigned, the worker assigned to the studio runs the workflow.
Requires Private Data: Indicates the workflow needs licensed data to run. Check the box, if the workflow needs licensed data, or leave it uncheckedif the workflow does not need licensed data.
Private Data Exemption: Give an exemption to allow a workflow with private data to run. Check the box, to allow an exemption or leave it unchecked to deny an exemption.
Make Public: To make the workflow public, select Make Public. The workflow is now publicly available on My Workspaces > Public to be viewed, this includes people with the link who aren’t signed in to the Server UI.
Ready to Be Migrated: This option is only available when the Curators Can Flag Workflows for Promotion setting is enabled on the Settings page. Check this boxto mark workflows and apps for migration. Go to Enable Workflows for Migration for more info.